Today, let me try to communicate some of the satisfaction that comes from making your own candles. Perhaps I'll make a convert out of you!
Even if you aren't inclined to believe in candle magick, you can create a little 'magick' of your own in your kitchen. And if you'd rather make 'tarts' for melting in a burner, it's even easier (just pour the hot wax into little pans that have been sprayed with vegetable oil; no wick involved).
Making candles in your kitchen fills your entire home with the aroma of candles twice; the first time as you craft them, the second as you burn and enjoy them. I also get enjoyment from working with warm wax. It reminds me of the time that I was a 'candy striper' in a local hospital, and how fun it was to plunge your hands into warm wax (it's used as an arthritis treatment). Note: I am not recommending you plunge your hands into the hot wax! The only effect you'll get from that is 3rd degree burns!
LET'S GET STARTED!
(My friend who's an attorney tells me to state a standard disclaimer: I am not responsible for any injuries or other misfortunes that may come to you if you choose to use my directions to make candles. I'm just an amateur, so feel free to browse other sites for further information)
Let's begin with the standard wax candle (I don't work with gel, it doesn't interest me in the least). You'll want to get together a bunch of wax. Now, if it's just for the pure pleasure of candle making, it doesn't matter if you recycle used bits of wax. If you're using the candles for magickal purposes, you can't recycle any used candles; although you can use candles that were never burnt.
Where do you get this wax? You can go to your local craft store and buy paraffin by the slab. Or, you can buy the more expensive beeswax or bayberry wax online (if you want to know the cheapest sources for these, let me know and I'll post it). Most candles are paraffin, and there's nothing wrong with starting with paraffin since it's the easiest wax to work with for beginners.
You can also go to your local thrift stores and find baskets full of discarded candles that no one thought about re-crafting. If you buy these, wipe them down and break the candles up and sort them by color. It makes it easier for you later on. I keep them in ziploc sandwich baggies so I can easily grab what I want when I want it.
You can also find slightly abused but wonderfully scented candles in close-out sections. They're great for recycling as well.
 In my case, I use all the waxes above.
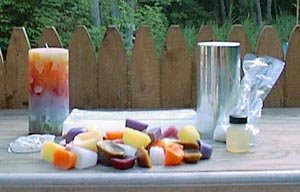
So, let's start you out making a chunk candle. These are actually the easiest ones to make, in my opinion. First you need to go shopping. Buy a metal pitcher (or use an old metal coffee pot with a pour spout). You can get those pitchers at your local craft stores for about $20.
You'll also need a candle mold which you can get at the craft store or buy on ebay (they have some great ones at fantastic prices there). You can use a homemade mold as well. Take a can or a carboard juice box that's rinsed well. Use a nail to put a hole in the middle of the bottom. Voila! You have a mold!
Incidentally, most candlemaking sources tell you that you need a thermometer. Well, I have one I've never used, so don't bother. After all, candles were made without them for hundreds of years. You'll also need:
- Scent, if you wish (you can buy this at the craft store or online)
- Wicks (you can buy them at the craft store or online)
- Unscented / unflavored cooking spray or the more expensive Candle Release Silicone Spray
- Mold Sealer (which is a type of grey putty)
- A larger pot that the wax kettle can rest in
- A large spoon, scissors, a strong knife, and a long pencil
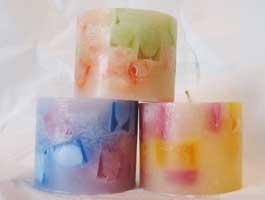
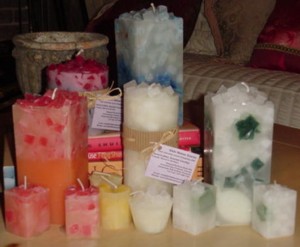
In the picture shown above, the candle actually went through six pours. You'll actually only pour one color over the chunks, so your candle will look more like this:
Take wax of a contrasting color and place it in your pot. Put the pot into another, larger pot and fill that larger pot with water. The wax kettle will rest inside that pot of water. Turn your burner to a low-medium to medium setting and keep an eye on this while it heats up. (Don't let any kids or pets get too close to this, of course).
While your wax is melting, prepare your mold. Cut a piece of wick that is 4" longer than your mold. Thread it through the hole in your mold, leaving 2" outside the hole. Use your mold sealer to seal the hole so that no wax will be able to seep through (if a little wax does get through, it's no big deal). On the open side of the mold, take the pencil and rest it on the top of the mold, and tie the wick around it, so that the wick is centered on the mold and is secured. Spray your non-stick coating on the inside of the mold (you'll regret it if you don't do this). I recommend placing your mold on a dinner plate, in case there's any leakage. It's much easier to clean that way.
Take the chunks and heap them up inside the mold, around the wick. Get as many as you can in there but don't fill them to the top of the mold. Leave about 1/4" to 1/2" from the top.
If you wish to add scent, then stir it in when your wax is completely melted; just before you pour it. (Hint: Wipe the spoon down immediatly after, while it's still hot. It makes it so much easier to clean later)
Pour the wax (carefully) into the mold, over the chunks and leave about a 1/4 C of wax in reserve. Try to cover the chunks completely. Let the candle cool for at least a couple hours. Your candle may form a depression as it cools. If it does, heat up the leftover wax again and pour it into the depression. You may have to do that more than once. When the candle is complete, pour any leftover wax into a plate to cool. You can then break it up and store it easily. Wipe out your wax kettle with paper towels while it's still hot and the wax is liquid (be careful). Again, it's much easier to clean that way.
Once the candle is fully cooled and is finished, pick the mold sealer from the wick and untie the wick from the pencil. Your candle should slide out easily. The top of the candle was once the bottom (where the sealer was). If the bottom is uneaven, you can heat up a plate in the microwave and slide it around on the plate until it's nice and flat.
OK, you've read about it. Now try it!
No comments:
Post a Comment